ComfyUI GPT 图像遮罩工作流
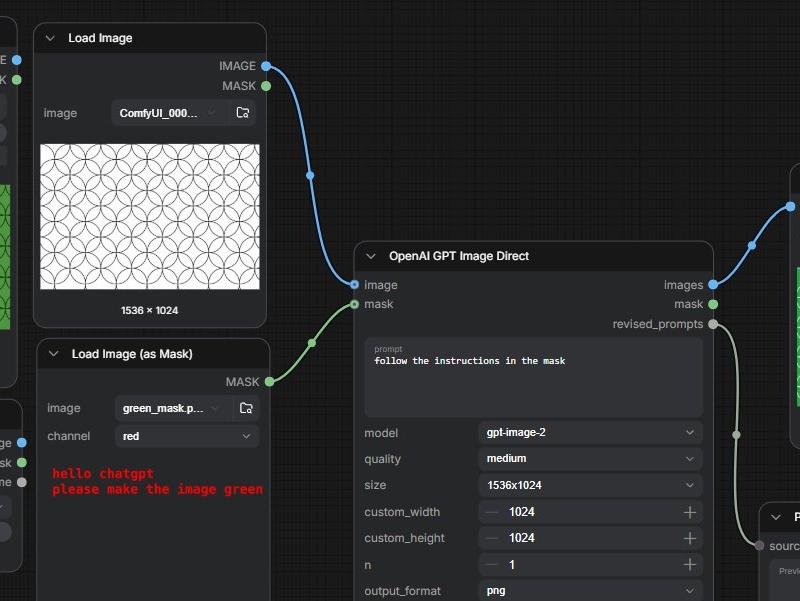
一张深色调的 ComfyUI 工作流截图,展示了通过嵌入在遮罩中的文本指令来控制 GPT 进行图像编辑的过程。
- 分类
- UI 与界面
- 模型
- GPT Image 2
- 来源作者
- gnostic snakes
- 原始语言
- en
- 来源 ID
- 24825
- 发布时间
- 2026年6月8日
完整提示词
目标:创建一个宽屏截图风格的图像,展示一个深色调的 ComfyUI 节点图,演示如何通过嵌入在遮罩中的文本指令进行 GPT 图像编辑。

画布:1200×580 水平画幅,深炭灰色网格背景,裁剪效果如同真实的工作流编辑器截图。使用清晰的 UI 面板,带有圆角、细微阴影、小型无衬线界面字体以及彩色连接线。

布局:在画布上从左至右精确排列 7 个可见的工作流节点。左侧包含 4 个节点,中间 1 个大型处理节点,右侧 2 个输出/预览节点。展示由曲线连接的蓝色图像插槽和绿色遮罩插槽。

节点及内容:
1. 左上角节点,标题为“Load Image (from Outputs)”。显示一个绿色矩形预览,内含重复的圆形/弧线几何图案,尺寸标签为“1536 × 1024”,包含图像选择器、自动刷新切换开关和刷新按钮等小型控件。
2. 中左上方节点,标题为“Load Image”。显示一个白色矩形预览,内含细黑色重复重叠的圆形图案,尺寸标签为“1536 × 1024”。将其蓝色 IMAGE 输出连接到中心节点的图像输入。
3. 中左下方节点,标题为“Load Image (as Mask)”。显示一个深色预览,上面有红色像素风格文本,第一行写着“hello chatgpt”,第二行写着“please make the image green”。通道下拉菜单显示为“red”。将其绿色 MASK 输出连接到中心节点的遮罩输入。
4. 左下角节点,标题为“Load Comfy Clipspace Mask”。包含标记为 clipspace_file “latest” 的控件和 invert_mask 切换开关,以及小型图像和遮罩插槽。该节点可见,但非主要连接点。
5. 中心节点,标题为“OpenAI GPT Image Direct”。具有标记为 image 和 mask 的输入;标记为 images、mask 和 revised_prompts 的输出。提示词文本框包含 {argument name="instruction prompt" default="follow the instructions in the mask"}。可见设置:model {argument name="model" default="gpt-image-2"},quality {argument name="quality" default="medium"},size {argument name="image size" default="1536x1024"},custom_width 1024,custom_height 1024,n 1,output_format png。将其蓝色 images 输出连接到 Save Image,将其灰色/绿色遮罩或修订后的提示词输出连接到 Preview as Text。
6. 右上角节点,标题为“Save Image”。显示 filename_prefix “ComfyUI” 和结果预览:同样的圆形图案现在变为亮绿色,左上角叠加着黑色文本指令“hello chatgpt”和“please make the image green”;尺寸标签为“1536 × 1024”。
7. 右下角节点,标题为“Preview as Text”,底部边缘部分被裁剪,连接自中心节点的 revised_prompts 输出;显示一个小的“source”标签和一个“Preview”区域。

视觉风格:写实的 UI 截图,深色主题,细微网格,圆角黑灰色面板,白色和灰色界面标签,蓝色和绿色插槽点,曲线状的蓝/绿色连接线。生成的图像预览应看起来扁平且具有程序化特征,而非照片级写实。

约束:保持工作流概念清晰可读:一张带有图案的白色输入图像加上包含文本指令的遮罩,生成一张绿色的图案输出图像。不要添加人物、ComfyUI/OpenAI 标签以外的品牌标识、额外的节点或装饰性元素。多语言2
ComfyUI GPT 图像遮罩工作流
zh-CN目标:创建一个宽屏截图风格的图像,展示一个深色调的 ComfyUI 节点图,演示如何通过嵌入在遮罩中的文本指令进行 GPT 图像编辑。 画布:1200×580 水平画幅,深炭灰色网格背景,裁剪效果如同真实的工作流编辑器截图。使用清晰的 UI 面板,带有圆角、细微阴影、小型无衬线界面字体以及彩色连接线。 布局:在画布上从左至右精确排列 7 个可见的工作流节点。左侧包含 4 个节点,中间 1 个大型处理节点,右侧 2 个输出/预览节点。展示由曲线连接的蓝色图像插槽和绿色遮罩插槽。 节点及内容: 1. 左上角节点,标题为“Load Image (from Outputs)”。显示一个绿色矩形预览,内含重复的圆形/弧线几何图案,尺寸标签为“1536 × 1024”,包含图像选择器、自动刷新切换开关和刷新按钮等小型控件。 2. 中左上方节点,标题为“Load Image”。显示一个白色矩形预览,内含细黑色重复重叠的圆形图案,尺寸标签为“1536 × 1024”。将其蓝色 IMAGE 输出连接到中心节点的图像输入。 3. 中左下方节点,标题为“Load Image (as Mask)”。显示一个深色预览,上面有红色像素风格文本,第一行写着“hello chatgpt”,第二行写着“please make the image green”。通道下拉菜单显示为“red”。将其绿色 MASK 输出连接到中心节点的遮罩输入。 4. 左下角节点,标题为“Load Comfy Clipspace Mask”。包含标记为 clipspace_file “latest” 的控件和 invert_mask 切换开关,以及小型图像和遮罩插槽。该节点可见,但非主要连接点。 5. 中心节点,标题为“OpenAI GPT Image Direct”。具有标记为 image 和 mask 的输入;标记为 images、mask 和 revised_prompts 的输出。提示词文本框包含 {argument name="instruction prompt" default="follow the instructions in the mask"}。可见设置:model {argument name="model" default="gpt-image-2"},quality {argument name="quality" default="medium"},size {argument name="image size" default="1536x1024"},custom_width 1024,custom_height 1024,n 1,output_format png。将其蓝色 images 输出连接到 Save Image,将其灰色/绿色遮罩或修订后的提示词输出连接到 Preview as Text。 6. 右上角节点,标题为“Save Image”。显示 filename_prefix “ComfyUI” 和结果预览:同样的圆形图案现在变为亮绿色,左上角叠加着黑色文本指令“hello chatgpt”和“please make the image green”;尺寸标签为“1536 × 1024”。 7. 右下角节点,标题为“Preview as Text”,底部边缘部分被裁剪,连接自中心节点的 revised_prompts 输出;显示一个小的“source”标签和一个“Preview”区域。 视觉风格:写实的 UI 截图,深色主题,细微网格,圆角黑灰色面板,白色和灰色界面标签,蓝色和绿色插槽点,曲线状的蓝/绿色连接线。生成的图像预览应看起来扁平且具有程序化特征,而非照片级写实。 约束:保持工作流概念清晰可读:一张带有图案的白色输入图像加上包含文本指令的遮罩,生成一张绿色的图案输出图像。不要添加人物、ComfyUI/OpenAI 标签以外的品牌标识、额外的节点或装饰性元素。
ComfyUI GPT 图像遮罩工作流
enGoal: Create a widescreen screenshot-style image of a dark ComfyUI node graph demonstrating GPT image editing from a text instruction embedded in a mask. Canvas: 1200×580 horizontal frame, dark charcoal grid background, cropped like a real workflow editor screenshot. Use crisp UI panels with rounded corners, subtle shadows, small sans-serif interface text, and colored connection cables. Layout: Arrange exactly 7 visible workflow nodes from left to right across the canvas. Include 4 nodes on the left, 1 large central processing node, and 2 output/preview nodes on the right. Show blue image sockets and green mask sockets connected by curved wires. Nodes and contents: 1. Top-left node titled “Load Image (from Outputs)”. It shows a green rectangular preview filled with a repeating circle/arc geometric pattern, size label “1536 × 1024”, and small controls including image selector, auto-refresh toggle, and refresh button. 2. Upper-middle-left node titled “Load Image”. It shows a white rectangular preview with thin black repeating overlapping circle pattern, size label “1536 × 1024”. Connect its blue IMAGE output to the central node image input. 3. Lower-middle-left node titled “Load Image (as Mask)”. It shows a dark preview with red pixel-like text reading “hello chatgpt” on the first line and “please make the image green” on the second line. The channel dropdown says “red”. Connect its green MASK output to the central node mask input. 4. Bottom-left node titled “Load Comfy Clipspace Mask”. Include controls labeled clipspace_file “latest” and invert_mask toggle, plus small image and mask sockets. This node is visible but not the main connection. 5. Center node titled “OpenAI GPT Image Direct”. It has inputs labeled image and mask; outputs labeled images, mask, and revised_prompts. The prompt textbox contains {argument name="instruction prompt" default="follow the instructions in the mask"}. Settings visible: model {argument name="model" default="gpt-image-2"}, quality {argument name="quality" default="medium"}, size {argument name="image size" default="1536x1024"}, custom_width 1024, custom_height 1024, n 1, output_format png. Connect its blue images output to Save Image, and its gray/green mask or revised prompt output down to Preview as Text. 6. Upper-right node titled “Save Image”. It shows filename_prefix “ComfyUI” and a result preview: the same circular pattern now colored bright green, with the black text instruction overlaid in the upper-left reading “hello chatgpt” and “please make the image green”; size label “1536 × 1024”. 7. Lower-right node titled “Preview as Text”, partially cropped at the bottom edge, connected from the central node’s revised_prompts output; show a small “source” label and a “Preview” area. Visual style: Realistic UI screenshot, dark theme, subtle grid, rounded black-gray panels, white and gray interface labels, blue and green socket dots, curved blue/green connector lines. The generated image previews should look flat and procedural rather than photorealistic. Constraints: Keep the exact workflow concept readable: a white patterned input image plus a mask containing text instructions produces a green patterned output. Do not add people, branding outside ComfyUI/OpenAI labels, extra nodes, or decorative elements.